Friday, December 30, 2011

Glittery Wine Glasses

These wine glasses are absolutely perfect for New Year's Eve!  You have probably seen this Pin once or twice, I know I have seen it pop up several times.  I have been wanting to do this one for a while, so I figured this was the perfect occasion.  The original tutorial tells you to use the Martha Stewart brand glitter craft paint, but my results following those steps didn't work out too well.  Here is what those ones looked like.

This is the bubble gum pink paint, which looked pretty bright in the bottle.  This is after three coats already.  It's hard to see the pink and it looks really streaky.  Since I wasn't loving these results, I moved on to plan B: Modge Podge and glitter.  I painted the Modge Podge on with a sponge brush.

Then I covered the glue with different colors of glitter and shook off the excess.  Right away the results were much better than the glitter paint.


I covered the tops of the glasses with masking tape before spraying the glasses with a clear sealer.  The tape served two purposes: it protected the lip area from the sealer (probably wouldn't taste too great) and it removed any glitter that was stuck in the lip area. (You should definitely wipe out the inside of the glass and the lip area before drinking from these.)

Here is the finished product!

If you want some of these glasses without the hassle of crafting (and without the hassle of cleaning up the glitter that gets all over the place) check back next week for a giveaway!  Happy New Year everyone!

Thursday, December 29, 2011

Yarn Wrapped Letters in a Frame

Okay, I was a very bad blogger when it came to this craft.  I only have two pictures, but I will try to explain the steps as best I can.  First, here is a look at the finished product...

I bought the "K" from Michael's, along with the yarn.  I am not a knitter by any means, so I just picked yarn that looked thin and was the right color.  I wish I had taken a picture of the back of the K because it is not pretty.  I used A LOT of masking tape trying to get this thing covered.  Before I attempted this project, I thought I would be able to wrap the letter with one long continuous strand and it would be pretty as a peach.  Not so much.  Maybe with a letter with less bends than a K that would be possible, but I had to wrap small sections at a time in order to get the coverage I wanted. 

The key to this project is to leave delusions of perfection at the door.  You will not be able to wrap the yarn all in one direction.  You will not be able to cover all areas of the letter without some overlapping.  It is not going to look smooth and perfect, but I think once you get the letter covered, you will like the finished product.  Rather than leaving the letter on its own, I decided to put it in a frame.

I took a plain white frame and wrapped the glass part (which on this frame was actually plastic) in the remnants of a brown paper bag.  I used hot glue to attach the letter to the brown paper, which not only made the project look complete, it hid the yucky backside of the letter.  Here it is again all put together.

Not exactly a quick and easy project, but I like the way it came out!

Wednesday, December 28, 2011

Make a Cheap Frame a Classy Frame

If you are anything like me, you like pictures.  I realized as I was unpacking that I have an insane amount of picture frames, and with leftovers from the wedding, let's just say I could open my own frame store.  But one thing I learned a long time ago is that the best thing to get your mom for any holiday is a nice framed picture.  They can't get enough!  So this is another Christmas gift, one I gave to both my mom and Matt's mom.  I found these frames at Wal Mart for $4 each!

I used a metallic silver craft paint and gave the frame a couple of coats.

I took a piece of white cardstock to make the mat, and then put in a picture of the family from our wedding.  Voila!  Perfect gift, which including supplies, cost under $10.


Can't wait to make some for our house too!

Tuesday, December 27, 2011

Interchangeable iPhone Case

Now that all of my gifts have been delivered, I can share some of the projects I made for friends and family for Christmas.  This is one of my absolute favorites, I love it so much I will probably make one for myself too!  I made this for my sister after seeing this inspirational Pin.  The hardest part was finding a clear phone case.  I had to go to a couple of different places before I found one that was plain and clear with no designs on it, but once I had that, it was easy.

I traced my own iPhone onto a piece of cardstock and cut it out to make a template.

I traced the template onto the back of some cool scrapbooking papers and one picture.

I cut out the basic shape and then placed the papers inside the phone case.  I marked the spot for the camera hole and then used my razor to cut it out.  That part was a little time consuming, but if you take it slowly it is pretty easy to do.

The finished product is on the right in the case.  The other papers can be swapped in for the pic to change up the look of the phone.  You can match your phone to your mood, your outfit, the season, whatever you want!  I love the way this came out and I think my sis did too!

Monday, December 26, 2011

New Facebook Page--Check it Out!

Hey readers, no Pinterest Monday today since we are still in the midst of Christmasing, but take a look at my new Facebook business page and like it!  I will be back tomorrow with some of the gifts that I made this holiday season!

Pink Cupcake Weddings on Facebook!

Saturday, December 24, 2011

Glittery Stocking Personalization!

So with school out for break, I FINALLY have had time to get some Christmas stuff done around the house.  I made the sparkly name ribbons for our stockings a couple weeks ago, but didn't have time to go shopping for new stockings until this week.  I once again dipped into my massive stock of leftover wedding banner letters and glittered them up.


I super glued the letters onto some wide black ribbon.

And tied the ribbons onto our new white stockings.

Cute and easy.  And tonight I finally got some presents wrapped.  Since it was so late in the game before we had time to even think about a tree, we just went with a little fake one.  Here's our little Christmas tableau.


Sorry for the poor lighting.  Hopefully there will be a new camera under the tree for me!  Happy holidays everyone!

Thursday, December 22, 2011

Spotlight on Ericka G Photography!

First off, it is officially Winter Break!  Woohoo!  So excited to be able to focus on the house and get some serious crafting done.  Today, I am going to share one of my favorite wedding vendors with you.  Ericka G is a brilliant photographer who is not only uber talented, but is also super fun to work with.  I shared one of her gorgeous weddings with you on my old blog (you can see that post here).  The reason I wanted to spotlight her today is because it can be hard to find wedding vendors who are reasonably priced, do a good job, and are fun to work with.  If you are in need of a photographer for any occasion, you should definitely check her out!  Here is some of her work...


These are all shots from the wedding we worked on together at Marvimon House.


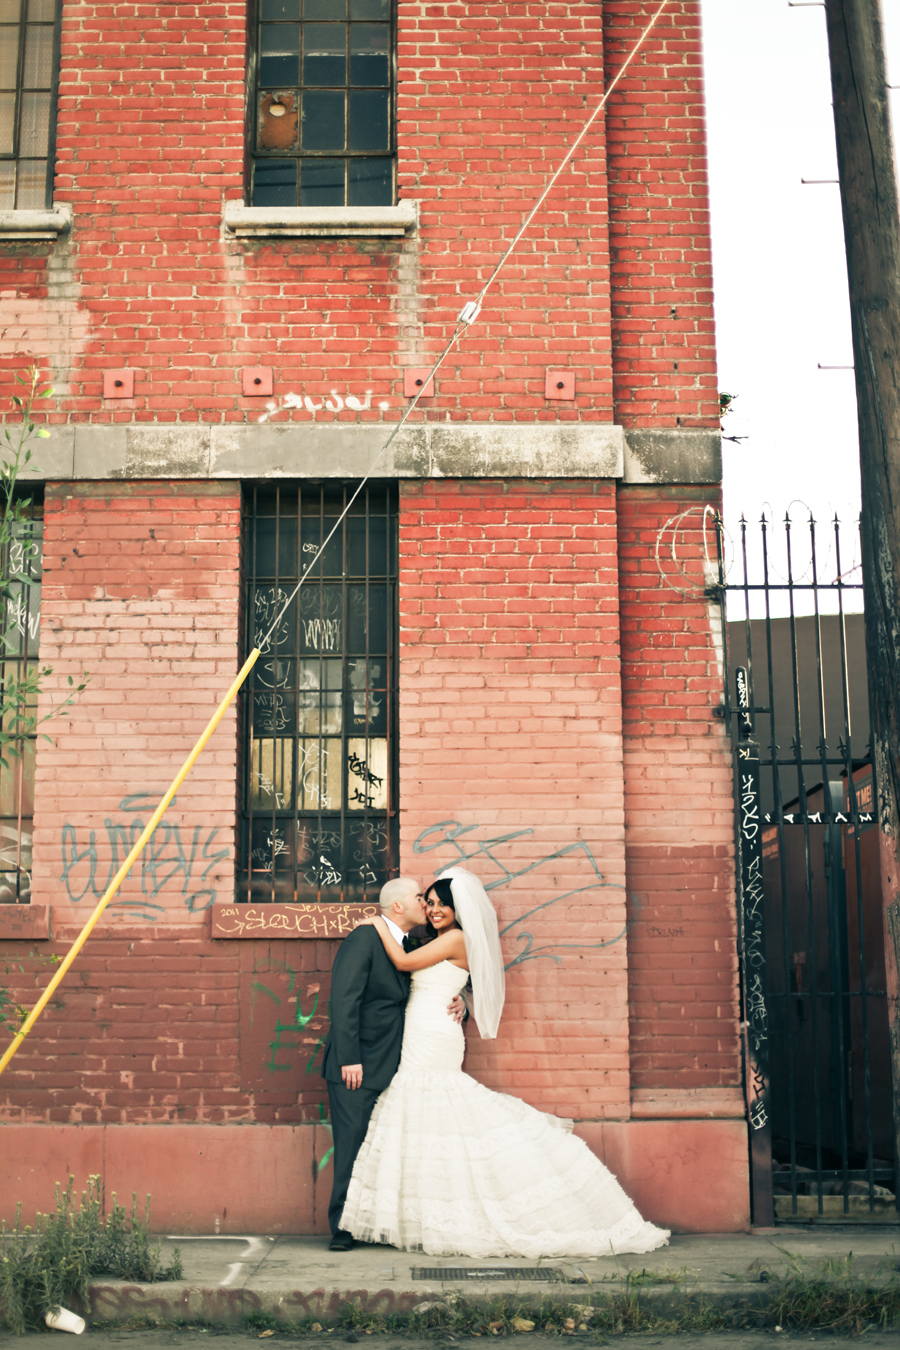
Ericka describes her style as "simple, timeless, fun. I shoot real life, not make believe situations. I want my clients to look at their photos in twenty years and not think they were trendy or “so 2011”. I love shooting natural light and candid. Capturing those moments that, when you look at your photos, take you back to that exact day in time."  The picture above is one of my favorites, I love the way it mixes the beauty of the wedding couple with the graffitied brick wall.  Such a cool and unique picture.

Ericka also loves shooting family portraits.  She says, "I obviously love shooting weddings, but other than that I really love shooting newborns. There is something about being able to capture a human life’s first photos that is so special. Especially first time parents. It’s just a really amazing time in the life of a family, and I get to share in it."  Here are some of her family shots.


So cute!  While we all love a good family photo, we know that wedding pictures are some of the most important pictures you will ever take.  I asked Ericka for some insider's tips on how to get the best wedding pictures.  She advises to " be aware of what time your wedding photos will be at. Do you really like the how your photographer uses natural light? If so, make sure your ceremony is early enough to make time for them afterwards when the sun is still high in the sky. Also, work with your photographer. Give them enough time to get the shots you really want. They don’t just appear out of thin air!"  Ericka definitely uses natural light beautifully.  Here are some more wedding shots.


So breathtaking!  I really think that you cannot underestimate the importance of your wedding pictures.  At the end of the day when you leave your reception, you will have your husband (or wife!), your rings and your wedding pictures.  Trust me, as someone who WISHES she had invested a little more into her pictures, you can't go wrong with someone as amazing as Ericka!

Note: I was in no way, shape or form compensated for this post, I just really love Ericka's work!

Monday, December 19, 2011

I'm Ready for Dinner Pinterest Monday!

Dinner is in the oven and I am hun-gry!  Perhaps this is why I was fixating on my "Yummies" board when scrolling through my Pins.  I am proud to say I have actually made a few of these things, and have legit plans to make them all at some point.  Maybe over winter break, which starts in two days!  Woohoo!

I made these for the cookie exchange, will post more about them later!


Pepperoni pizza bites, perfect party food!

Chicken bacon ranch pasta.  I like all of those things.


Caramel apple cheesecake bars.  Yes please.


Chicken, bacon, potatoes, and cheddar in the Crock Pot--made this last night and it's pretty tasty!

Sorry if I made you hungry!  Go make some of these tasty looking dishes!